Google Shopping Custom Labels: A Merchant's Guide to Margin-Based Bidding
Google’s Smart Bidding algorithm optimizes for conversions, not profit. A $15 order on a $14 product looks identical to a $15 order on a $1 product, and the algorithm treats them the same. Budget flows toward volume, not margin, and the merchant pays the difference.
Google Shopping custom labels are how you fix this. They are five merchant-controlled fields — custom_label_0 through custom_label_4 — that you write to your product feed with whatever values you choose. Google does not use them for relevance, and they never appear in listings. Their only job is to let you segment your catalog for bidding purposes inside Google Ads.
The merchant who masters custom labels is running a fundamentally different campaign than the one who does not. Same products. Same bids on paper. Different information flowing to the algorithm — and that information changes where the money goes. This guide is for the practitioner who already knows custom labels exist and wants to use them better.
What Custom Labels Actually Are (And What They’re Not)
The five slots are custom_label_0 through custom_label_4. Each accepts up to one hundred characters, though twenty-five is the practical ceiling. The values are completely merchant-defined.
What custom labels are not:
- Not relevance signals. Google does not match queries against custom label text.
- Not visible to buyers. They never appear in listings, ads, or shopping results.
- Not permanent. Update your feed and the new value overwrites the old one on the next fetch.
What they are: bidding levers. You write a value to a label. That value flows from your feed into Google Merchant Center, then becomes a segmentation dimension inside Google Ads product groups. You apply different bid strategies, Target ROAS goals, or exclusions to the resulting groups, and Smart Bidding optimizes inside each one against the target you set.
Custom labels do not change which products Google decides to show. They change how much you are willing to pay for the clicks Google brings you, and which products you want the algorithm to prioritize when budget is finite.
Business outcome: Properly structured custom labels turn a single, undifferentiated campaign into a portfolio calibrated to the economics of each product segment. Budget efficiency improves because money stops flowing equally to products with unequal profitability.
The Five Slots — How to Think About Each One
Most merchants who set up custom labels at all stop after one or two slots and use them inconsistently. The fix is to treat the five slots as a deliberate allocation, where each slot has a single, durable purpose. Here is one that works for most Shopify catalogs.
Slot 0 (custom_label_0) — Performance tier
How is this product actually selling? Performance changes over time, so this is one of the two labels you will refresh most often.
bestseller— top twenty percent by revenue over the last ninety daysmid-performer— next forty percentlong-tail— bottom forty percent
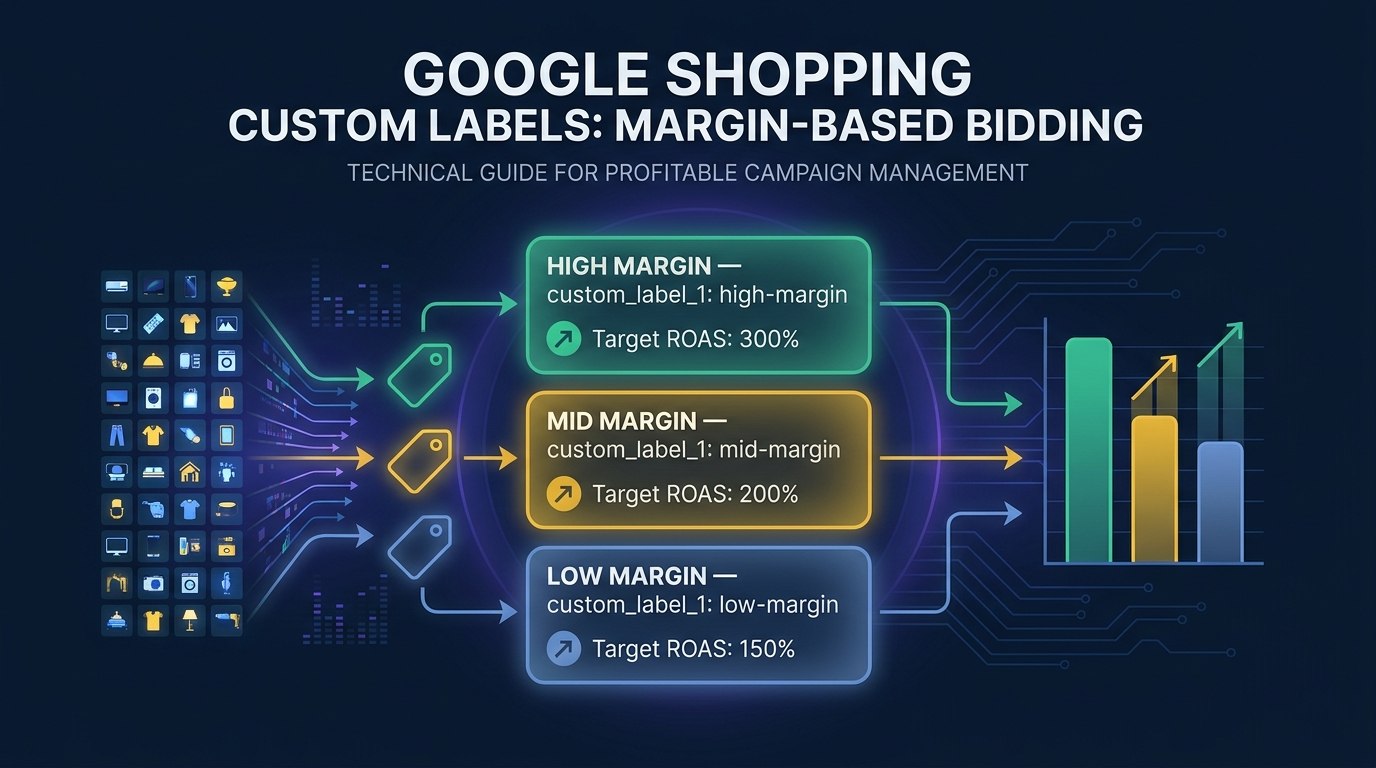
Slot 1 (custom_label_1) — Margin tier
The most important slot for ROAS optimization, and the signal Smart Bidding does not have unless you provide it.
high-margin— forty percent gross margin or highermid-margin— twenty to forty percentlow-margin— under twenty percent
If you have absolute margin data per SKU, label by dollar bands instead (margin-over-25, margin-10-to-25, margin-under-10). The point is to give the algorithm something to bid against.
Slot 2 (custom_label_2) — Seasonality and campaign timing
Time-bound labels for promotional cycles and seasonal inventory.
evergreen— year-round inventoryspring-summerorfall-winter— seasonal categoriessale— currently on promotion (set when the sale goes live, remove when it ends)clearance— end-of-life inventory to liquidate quickly
Slot 3 (custom_label_3) — Lifecycle and strategy
Where each product sits in its lifecycle.
new-arrival— recently added, needs a visibility investment before it has performance dataproven— strong historical conversion rate, profitable to scalesuppress— a Vampire or Zombie SKU identified in your audit, pull spend back to near zero
Slot 4 (custom_label_4) — Reserved for testing
Keep this slot clear for feed-level A/B test assignment. When you run a feed test — a title variant, a description variant, an image swap — this is where you write test or control per the methodology in how to run feed-level A/B tests. Fill this slot with something else and you lose the cleanest mechanism for test-group tagging in your feed.
A note on slot discipline. Repurposing a slot mid-campaign resets the learning Smart Bidding has built up against the previous segmentation. Decide your allocation, document it, and stick with it across at least a full quarter.
Business outcome: A disciplined slot allocation gives you four independent dimensions to slice your catalog inside Google Ads — performance, margin, seasonality, and lifecycle — without the labels colliding. That is the foundation for everything that follows.
Five slots, one job each
Pick a product to see how it resolves across all five custom-label slots.
Top 20% of revenue, last 90 days
45% gross margin
Year-round inventory
Strong, stable conversion rate
Control group in an active title test
Each slot does one job. Every product answers the same five questions in the same five places —that discipline is what keeps Smart Bidding’s signals clean enough to bid on.
Margin-Based Bidding — The Highest-Leverage Use Case
Most merchants run their Shopping campaigns with a single Target ROAS goal across the entire catalog — four hundred percent applied to everything. That is a blunt instrument applied to a nuanced problem.
The same ROAS target lands very differently across products of different margins. A 400% Target ROAS on a 40% margin product is profitable — you spend a quarter of revenue to acquire a sale that returns gross profit well above ad cost. The same target on a 12% margin product is not — gross profit barely covers the ad spend, and any cost above the click eats the rest.
When Smart Bidding hits a blended 400% ROAS across a mixed-margin catalog, the aggregate looks fine. The underlying economics are quietly broken. You are winning auctions you should not be winning, and funding those losses with the margin from the products that are working.
Here is how margin-based bidding fixes this with custom labels:
- Label products by margin tier in
custom_label_1. Use a feed rule that pulls from a margin metafield, a supplemental feed, or — at minimum — a product-type-to-margin mapping. - Build separate product groups in Google Ads segmented by the custom label value. Works in standard Shopping listing groups and inside P-Max.
- Set different Target ROAS goals per group:
- High-margin (40%+): aggressive Target ROAS around 300–350%. Margin absorbs the lower ROAS, so you can bid harder and capture incremental volume.
- Mid-margin (20–40%): moderate Target ROAS of 400–500%.
- Low-margin (under 20%): high Target ROAS of 600%+, or exclude from Shopping entirely if they cannot clear that bar.
- Let Smart Bidding optimize inside each group against a target calibrated to that group’s actual profitability.
The algorithm spends more aggressively where your economics are strong and pulls back where they are not — the same adjustment a thoughtful human would make manually, except systematic, self-updating, and running at the product level.
Where margin data comes from. If you have margin data in Shopify — a cost-per-item field, a metafield, or a price-cost comparison — a supplemental feed or feed rule can inject it into custom_label_1 directly. If you do not, start with product category as a proxy and refine as conversion data accumulates.
Business outcome: Budget flows toward margin instead of revenue. Total revenue typically holds steady or grows while gross profit and MER improve materially. The blended ROAS number may look the same on the surface, but the dollars underneath are doing more work.
Margin-Tier ROAS Calculator
One Target ROAS across mixed margins hides where the money leaks. Set your tier margins and see.
At a single 400% Target ROAS, that much of your $50,000 budget flows into tiers that lose money on every sale — funded by the margin from the tiers that work. Per-tier Target ROAS stops the leak.
Assumes budget split evenly across tiers. Net margin = gross margin − ad cost as a share of revenue (1 ÷ ROAS).
Performance Tiers — Making Smart Bidding Work For Your Catalog
Margin is the most important signal you can give the algorithm. Performance history is the second.
Google’s algorithm learns from conversion data at the product level. New products have no history, so the algorithm either over-invests in their cold start or starves them of impressions. Long-tail products sit in the middle on volume but at the bottom on efficiency, quietly absorbing budget that would do more work elsewhere. Treating all three groups identically wastes budget on unproven inventory and under-invests in what is working.
How to build performance tiers:
- Pull ninety days of conversion data from Google Merchant Center or GA4 at the product level. Rank by revenue, conversions, or margin-weighted revenue.
- Segment the catalog: top twenty percent by revenue equals
bestseller, next forty percent equalsmid-performer, bottom forty percent equalslong-tail. - Write the values to
custom_label_0via a feed rule or supplemental feed. - Apply in Google Ads: best-sellers get aggressive bids and the largest budget share, mid-performers get a moderate target, long-tail gets a conservative target or its own campaign with a small dedicated budget.
While pulling performance data, run a Vampire and Zombie detection pass.
- Vampire SKUs: high spend, near-zero conversions. Assign
suppressincustom_label_3and exclude until you understand why they are not converting. - Zombie SKUs: near-zero impressions, no clicks. Audit for data quality issues — missing GTINs, miscategorization, weak images — before deciding whether to suppress or fix the underlying feed problem.
The same performance dataset that informs custom label assignment tells you what to test. A product with impressions but a weak CTR is a title test candidate. Strong clicks but a weak conversion rate points at a description or image test. The bridge into feed-level A/B testing is direct: custom labels are the tagging mechanism, and the performance data points at what to put on the test bench.
Business outcome: Smart Bidding becomes meaningfully smarter once it can see which products have proven themselves. Wasted impressions on Vampire SKUs drop, long-tail spend gets bounded, best-seller budget grows. Net effect is a higher MER on the same total ad spend.
Implementing Custom Labels — The Feed Rule Layer
Custom labels do not get set manually per product. With thousands of SKUs in the catalog, manual assignment is not the workflow.
Labels get set via feed rules that apply values based on conditions — product type, SKU prefix, metafield, vendor, tag, or any other attribute in the feed. The rules engine evaluates each product on every sync. This is the same logic layer covered in our guide on product feed management, and custom label assignment is one of its highest-value applications.
Three practical ways to assign labels at scale:
1. Rules based on product attributes (most common)
A typical rule reads:
IF
product_typecontainsOuterwearTHENcustom_label_1=high-margin
This works whenever margin or performance correlates reliably with a category, vendor, or tag. Layer rules in sequence — outerwear is high-margin, accessories under $20 are low-margin, everything else defaults to mid-margin — ordered so the most specific conditions evaluate first.
2. Supplemental feed from a spreadsheet
For data that does not live in Shopify, maintain a Google Sheet with Product ID (or SKU) and label value columns, then connect it as a supplemental feed in GMC. The supplemental data merges with the primary feed and populates the label fields without touching the underlying product records.
This is the right path when margin data lives in your finance system or COGS file. The downside: supplemental sheets drift out of sync if you do not maintain them.
3. Metafield-based rules
If margin tier or performance tier lives in Shopify metafields — for example product.metafields.custom.margin_tier — a feed rule reads the metafield directly and writes its value into the label field. The metafield becomes the single source of truth. Update it, and the next feed sync propagates the change automatically.
Refresh cadence:
- Performance tier (
custom_label_0): monthly at minimum. - Margin (
custom_label_1): when pricing or COGS changes. - Seasonal (
custom_label_2): when promotions go live and when they end. A stalesalelabel is worse than no label — it tells the algorithm the product is still discounted when it is not.
Labels that are not maintained become noise. A bestseller label on a product that stopped selling six months ago is actively misleading the algorithm, and the algorithm will respond by spending budget that no longer makes sense.
Business outcome: Automating assignment through feed rules turns custom labels from a one-time project into an always-on capability. The labels stay current as the catalog and performance evolve, and the bid strategies sitting on top of them stay calibrated to reality.
Custom Labels in Performance Max
Performance Max uses your feed as the primary input for both asset assembly and product selection. Custom labels flow into P-Max the same way they flow into standard Shopping — as segmentation dimensions inside listing groups.
This matters more every quarter because P-Max is cannibalizing standard Shopping traffic. Without custom label segments, P-Max decides which products to push, at what bid, against what audience signal, and the merchant gets a single ROAS number with limited visibility into what is happening underneath.
Custom labels are one of the few structural levers merchants still have inside P-Max:
- Exclude low-margin products entirely, or split them into a separate P-Max campaign with a higher Target ROAS so they cannot pull budget from the products that are working.
- Give new arrivals a visibility investment with a dedicated
new-arrivallisting group and a learning-phase budget. - Concentrate spend on proven performers by giving
bestsellerandhigh-marginsegments their own listing groups with aggressive targets. - Suppress Vampire and Zombie SKUs using
custom_label_3.
On feed testing inside P-Max: the standard workaround (exclude test SKUs from P-Max, run them in standard Shopping with manual CPC for the duration of the test) still applies. Keeping custom_label_4 clean lets you orchestrate those experiments alongside P-Max without the test labels colliding with production segmentation.
Business outcome: Inside P-Max, custom labels are the difference between handing the algorithm a blank check and giving it a budget with guardrails. Merchants who use them recover a meaningful amount of the strategic control P-Max otherwise takes away.
The Ongoing Work
Custom labels are not a one-time setup. They are a maintenance commitment, and the labels are only as valuable as the data behind them — data that changes every month as performance shifts, promotions launch and expire, new SKUs enter the catalog, and margins move with costs and prices.
The merchants who get the most value build refresh into their feed management workflow. Pull performance data monthly, update tier assignments, push new values via supplemental feed, metafield update, or rule re-evaluation. With the right tooling, most of this happens in the background — feed rules re-evaluate on every sync, metafields become the source of truth, and the labels follow automatically. Doing it by hand needs a calendar reminder. Skipped months show up later as drift in the bid targets and quietly eroded MER.
The payoff compounds. Every refresh cycle, the algorithm gets slightly more accurate information about where to spend money. Over six to twelve months, that becomes meaningfully better ROAS on the same catalog — without changing a single bid manually.
Stop Hand-Maintaining Your Custom Labels
Custom labels are one of the highest-leverage levers in Google Shopping, and one of the most operationally tedious to keep current. The strategic payoff is real, the maintenance burden is real, and most merchants stop at the first because they cannot keep up with the second.
Simple Product Feeds handles custom label assignment as part of its rules engine. Write values based on product type, vendor, tag, metafield, or supplemental feed data, and the labels stay current automatically as the rules re-evaluate on every feed sync. Margin tiers update when your metafield updates. Performance tiers refresh on the cadence you set. Seasonal labels turn on and off with your promotional calendar.
The result is the version of custom label management that actually compounds: always current, calibrated to your real margin and performance data, quietly improving your ROAS every month while you focus on the rest of the business.
Start a free Simple Product Feeds trial and put your custom labels on autopilot.
Ready to simplify your product feeds?
Simple Product Feeds connects your Shopify store to Google Shopping, Meta, and more — in minutes.
Install Simple Product FeedsFrequently Asked Questions
- What are custom labels in Google Shopping?
- Custom labels are five merchant-controlled fields (custom_label_0 through custom_label_4) that you write to your Google Shopping product feed. Google does not use them for matching, relevance, or display — they are invisible to shoppers. Their only purpose is to let you segment your catalog inside Google Ads so you can apply different bid strategies, Target ROAS goals, or campaign structures to different groups of products.
- How do I use custom labels for margin-based bidding?
- Tag each product with a margin tier in custom_label_1 (for example: high-margin, mid-margin, low-margin). In Google Ads, build product groups segmented by that custom label value, then set a different Target ROAS for each group — aggressive on high-margin products, conservative on low-margin ones. Smart Bidding then optimizes within each group against a target calibrated to that group's actual profitability, so budget flows toward margin instead of raw revenue.
- Do custom labels work in Performance Max?
- Yes. Custom labels flow into Performance Max the same way they flow into standard Shopping campaigns. You can use them inside listing groups to exclude low-margin products, prioritize new arrivals, or concentrate spend on proven performers. This is one of the few structural levers merchants still have inside P-Max, which otherwise hands most decisions to the algorithm.
- How often should I update custom labels?
- Performance-tier labels (custom_label_0) should refresh at least monthly as sales data accumulates. Margin labels (custom_label_1) are more stable — update them when pricing or COGS changes. Seasonal and promotional labels (custom_label_2) should change when sales go live or end. Stale labels mislead the algorithm, so the refresh cadence needs to live inside your feed management workflow, not a one-time setup.
Related Articles

Your Shopify Product Feed Is a Testing Platform — Here's How to Use It
Most merchants treat their feed as a sync task. Here's how google shopping feed optimization with feed rules generates real marketing signal — and what to do with it.

The Complete Guide to Product Feed Management for Shopify
Product feed management is more than syncing your catalog. Here's the complete guide to how it works, what breaks, and how Shopify merchants do it right.